Volunteer Scheduling
Scheduling can be done on an individual basis or for an entire group. It is recommended to use the group scheduling in Staff Schedules, as it contains more features and gives a better overview.
Contents
- Group scheduling
- Scheduling for individual person
- Sending schedules
- Send to multiple groups
- Example of sent schedule
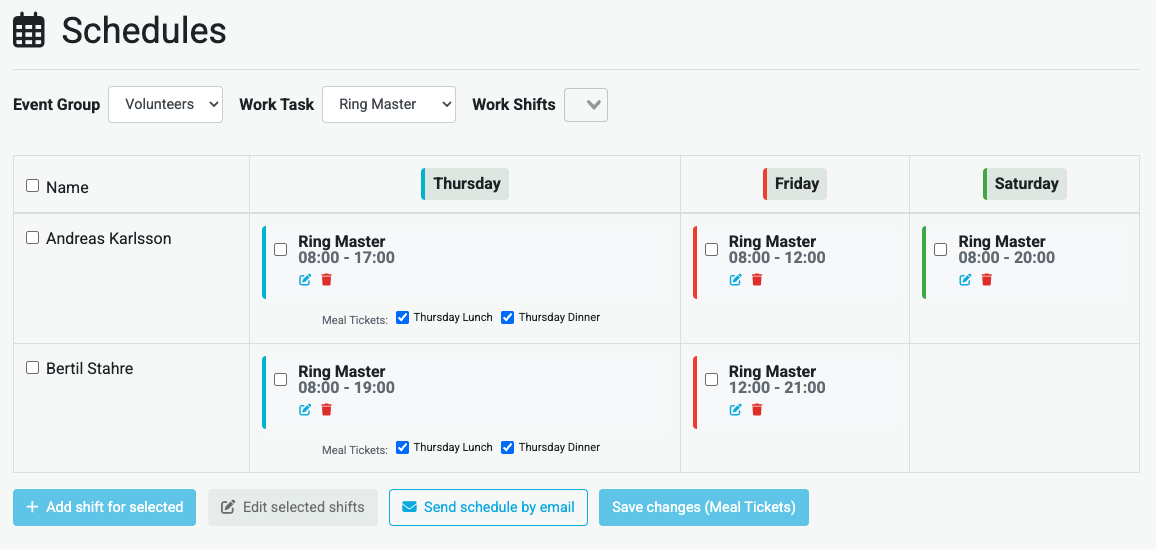
Group scheduling
Group scheduling is done in the Staff Schedules view under the event. Here a table is displayed where each row is a person and each column is a shift (day).
Step 1: Select filter
To see people in the table you must first select at least one filter:
- Group – Select an event group to display all people in the group.
- Task – Select a task to display only people who are already scheduled with that task on at least one occasion.
- Subgroups – If the group has subgroups this filter is displayed. You can filter on one or more subgroups.
- Shift – Filter which days (shifts) should be displayed in the table.
Tip: You can combine group and task. If you select both, people who belong to the group and have the selected task are displayed.
Step 2: Create a shift
There are two ways to add a shift:
Option A – From a cell
- Hover over the cell where the person and day meet.
- Click on the plus sign (+) that appears.
- Fill in the form (see below).
Option B – For multiple people at once
- Select the people with the checkbox to the left of the name (or use "Select all" in the table header).
- Click the Add shift for selected button at the bottom.
- Fill in the form (see below).
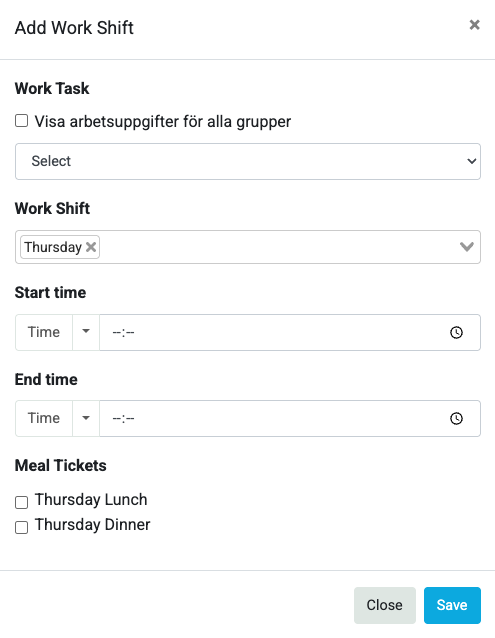
Step 3: Fill in the shift form
In the box that opens you enter:
| Field | Description |
|---|---|
| Task | Which task the person should perform. The "Show tasks for all groups" checkbox displays tasks from all groups, not just the selected one. |
| Shift | Which day or days the shift applies to. For a new shift you can select multiple days. |
| Start time | Enter time manually or select a predefined time label (e.g. "End of competitions") from the dropdown menu. |
| End time | Same as start time. |
| Meal tickets | If meal tickets are available for the day you can check which ones to assign. |
Edit and delete shifts
- Edit – Click on the pencil icon on the shift.
- Delete – Click on the trash icon on the shift.
- Edit multiple shifts – Select the shifts with the checkbox on each shift, then click Edit selected shifts. This works when the shifts belong to the same person or the same day.
Meal tickets in the table
If meal tickets are enabled for the event you can assign them directly in the cells. Check or uncheck the meal tickets under each shift. Click Save changes (Meal tickets) when you are done.
"Preferred day" badge
If a person has registered that they prefer to work a certain day, a blue "Preferred day" badge is displayed in the cell. This helps you prioritize who gets the shift.
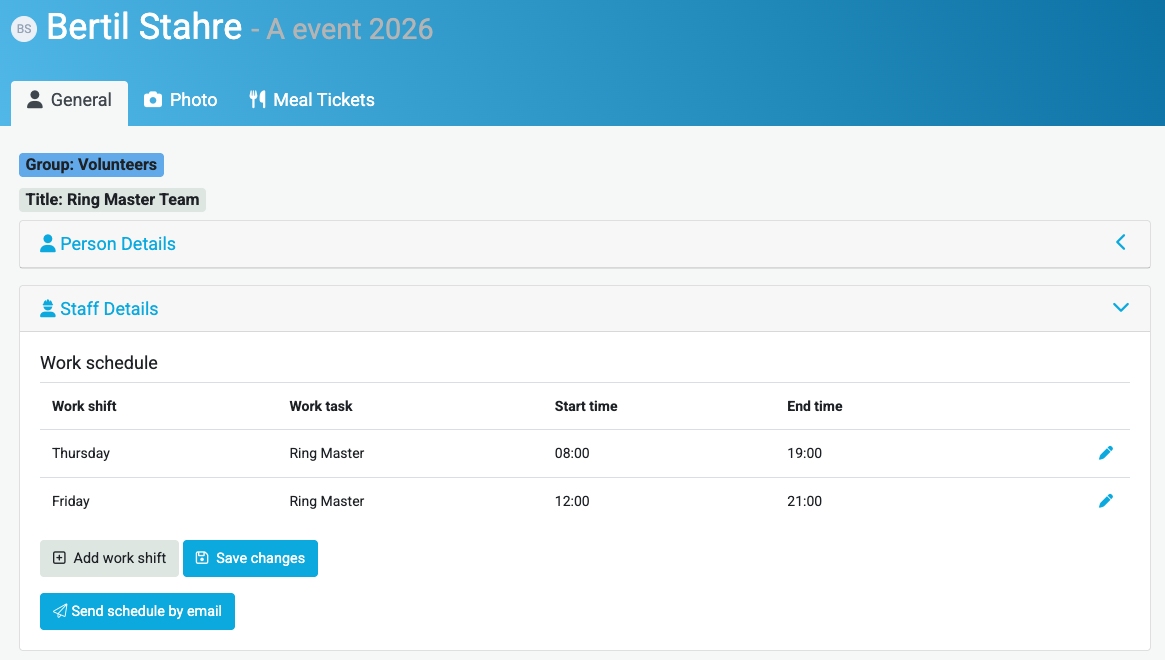
Scheduling for individual person
To create a schedule for an individual person:
- Search for the person under the event.
- Go to Staff details.
- Add or edit shifts there.
Sending schedules
The easiest way to send schedules is from the Staff Schedules view:
- Select group (and optionally subgroup) so the right people are displayed.
- Click Email schedule.
- In the modal that opens:
- Select language for the schedule (Swedish/English).
- Enter reply-to email (required).
- Enter subject and message (optional).
- Choose to send to all listed people or to selected people (if you have marked any with the checkbox).
Tip: The schedule is sent to everyone displayed in the table based on your filters. Make sure the right group is selected before sending.
Work schedules can also be sent one by one by going to the person and under Staff details clicking Email schedule.
Send to multiple groups
Alternatively you can send schedules to multiple groups at once:
- Go to Email in the menu.
- Select campaign type Staff Schedules.
- Check the group or groups you want to send to.
- Enter the email subject and write a message.
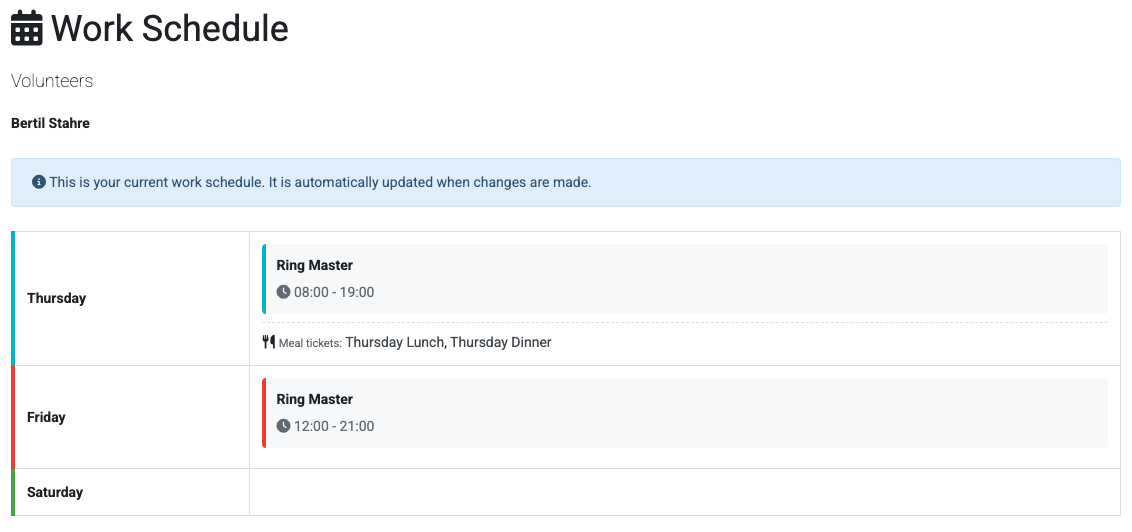
Example of how the schedule can look when it has been sent
The schedule is emailed as a link, which means that changes are visible immediately if the recipient reloads the page. The link also shows which meal tickets the person has been assigned.