Volunteers Step-by-Step
This guide describes how to use the system to receive interest registrations from people who want to be volunteers, convert these to people in the event and create volunteer schedules.
Contents
- Enable Staff Schedules
- Configure preferred task and shifts
- Create tasks and shifts
- Create registration form
- Manage registrations
- Accept and create person
- After the person is created
- Scheduling
1. Enable Staff Schedules
- Go to Events in the main menu and open your event.
- Go to Settings for the event.
- Click on the Staff tab.
- Enable the Staff Schedules feature.
Tip: If the Staff tab is not visible, the feature is not enabled for your account. Contact the administrator.
2. Configure preferred task and shifts
If you want volunteers to be able to specify which task and which days they prefer to work:
- Go to Settings → Staff → Settings.
- Check Preferred task – lets the person specify which task they want.
- Check Preferred shifts – lets the person specify which days they are available.
- Click Save settings.
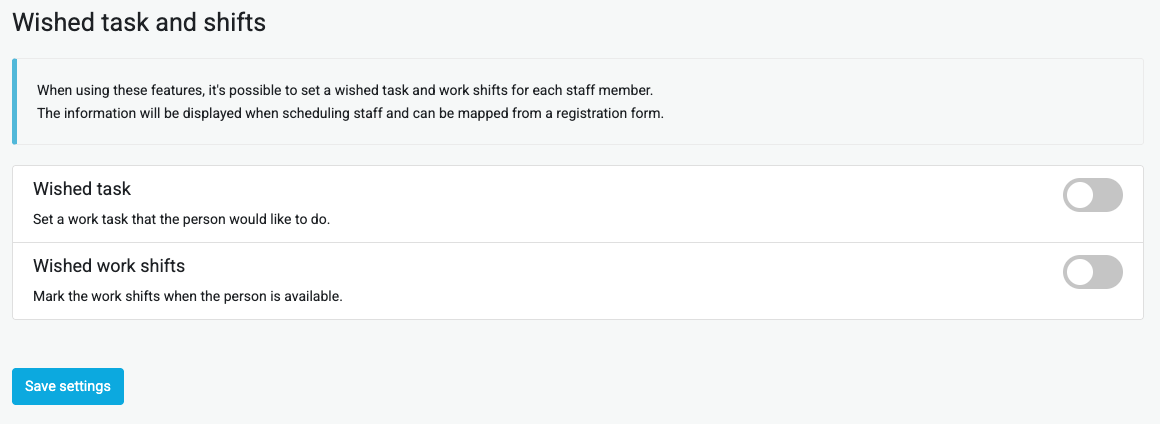
Note: This information is then displayed in the scheduling view as a blue badge "Preferred day" and helps you prioritize who gets the shift. If you create a form with fields for task and shifts, these values can be carried over automatically when you convert a registration to a person.
3. Create tasks and shifts
Before you can schedule you must create the tasks and shifts that are available to choose from.
Tasks
- Go to Settings → Staff → Tasks.
- Create the different tasks that should exist (e.g. "Cashier", "Info", "Stage").
- You can create subtasks or specify that a task should only be available for certain groups.
Shifts
- Go to Settings → Staff → Shifts.
- Create the shifts. The easiest is to set each day as a shift – more precise times are set during scheduling.
4. Create registration form
- Go to Forms in the menu under the event.
- Create a new form or edit an existing one.
- Add the fields you need: name, email, phone, photo, etc.
- If you have enabled preferred task and shifts (step 2), add fields of type Task and Shift – these values are carried over to the person when converting.
- Go to Settings for the form.
- Under Registration status – select Pending. Then new registrations will be in Pending status and you can manually decide which to accept.
- Under Convert to person – choose how group assignment should work:
- Individual – you choose the group for each person when you accept.
- Group – all are placed in the same group (choose which under settings).
Read more about forms in Forms.
5. Manage registrations
- Open the form for registration (or share the link to it).
- When registrations come in, go to Forms → select the form → Registrations.
- Click on a registration to see details.

Buttons depending on status
| Status | Available actions |
|---|---|
| Pending | Accept registration – sets status to Accepted without creating person. Accept and create person – creates person in the event (recommended for volunteers). Mark as declined – rejects the registration. |
| Accepted | If person not created: Accept and create person. If person already created: link to the person is displayed. |
| Declined | – |
6. Accept and create person
To convert a registration to a person in the event:
- Open the registration.
- Click Accept and create person.
If group assignment is individual
A modal opens where you choose which group the person should be placed in.
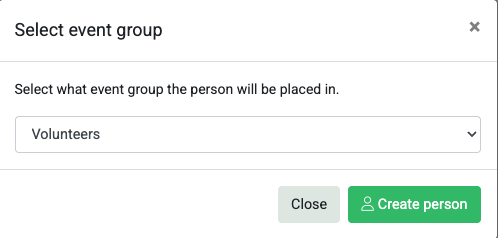
Select group and click Create person.
If group assignment is group
The person is created directly and placed in the group you chose under the form settings.
Note: If you have added fields for task and shifts in the form, and mapped these in Field mapping under the form settings, these values are carried over to the person. They are then displayed in the scheduling view.
7. After the person is created
When a person has been created they are:
- Searchable under People in the event.
- You can print accreditation badge or assign wristbands (depending on which setup you use).
- Under Staff details you can edit details, add shifts and send the schedule via email.
8. Scheduling
When the people are created you can schedule them. The easiest is to use the group scheduling under Staff Schedules.
See the complete guide: Volunteer Scheduling.
Done!
You now have a complete flow from interest registration to scheduled volunteer.